
My 6-Month Internship Journey at OYO : Work, Learnings, and React Native + Redux Insights ⚛️📊
A deep dive into real-world technology, full-stack development, Redux, backend APIs, and building scalable, brand-agnostic solutions during my OYO internship
1.🌟About me :
Hi developers!👋
I’m Shreya Tiwari, currently a Software Engineer at UKG. I graduated in 2025 from Indira Gandhi Delhi Technical University for Women.
Earlier, I completed a 6-month internship at OYO Rooms (Jan–July 2025) where I worked on designing scalable, brand-agnostic solutions beyond just feature development. Along the way, I’ve built strong skills in React Native, Redux, Spring Boot, Golang, PostgreSQL, Java, and Kubernetes, and I’m continuously expanding my technical toolkit.
This article captures my internship journey at OYO: the work I did, the learnings I gained, and the React Native + Redux insights that shaped me as a developer.🎯🚀
Press enter or click to view image in full size
2. 💡 Landing the Internship
The OYO internship was an on-campus opportunity in Nov 2024. The process included:
- Online Assessment 📝 — Coding challenges focused on DSA and problem-solving
- Technical Interviews 💻 — Questions on Data structures & algorithms, and CS fundamentals
🔗For Detailed interview experience click here!
3. 🧩 Problem Statement
The challenge? Multiple OYO teams were relying on separate tools like Salesforce, HubSpot, and OYO360 to manage leads (onboarding). This not only meant high subscription costs but also fragmented workflows across brands.
Each brand had different requirements for leads, opportunities, contracts, and PIPs. Traditionally, this would mean creating separate listing pages and repeating logic over and over.
Our goal was clear: build a single, unified Lead Management System (LMS) that could power different brand journeys (G6, CMG, and others) with flexible stages, statuses, and validations — all without needing constant redeployments.
Press enter or click to view image in full size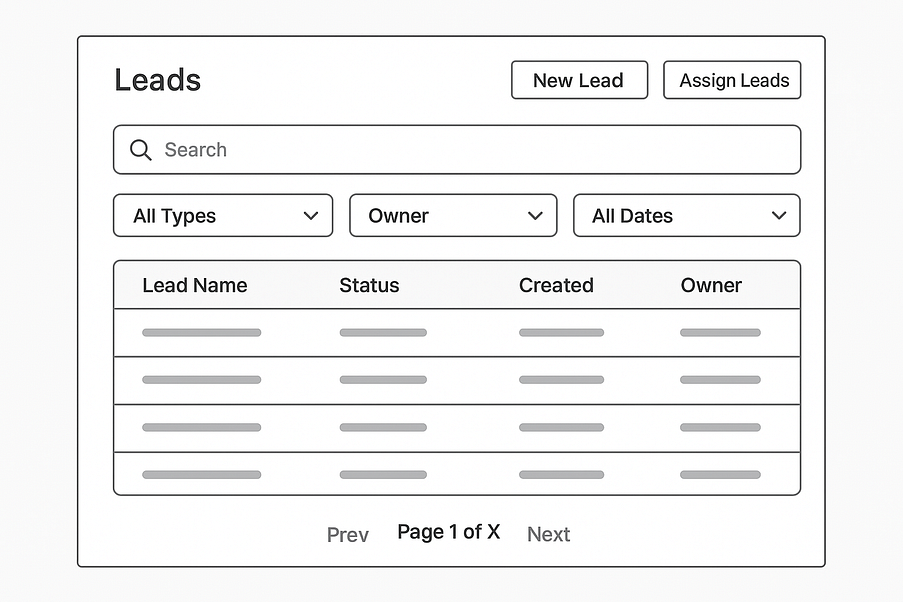
Fig 1.1 — Structure of the LIsting page
4. Solution: Widget-Driven Onboarding system 🔍
I built a generic listing page capable of handling multiple brand objects using a widget-driven approach. Key design elements:
- 🏷️ Header: dynamic display of title , statuses and header ctas (buttons).
- 🔍 Filters: dropdowns, searchable dropdowns, and date pickers.
- 📋 Table: based on OYO’s internal library, with switch-case logic for brand-specific column configurations.
- Column-Level Table Configuration: Each column could have different display requirements. I created a generic table config mapping column keys to primary data, secondary data, and optional tag values. This allowed a single table component to handle multiple display patterns across different brands or objects.
What were widgets? (think like json)
Instead of hardcoding the UI for each brand, the backend sends widget configurations — such as table structure, filters, headers, and CTA buttons — and the frontend dynamically renders them. This meant that any UI or data-level change could be achieved by updating the widget response from the backend, without needing a frontend redeploy. In simple terms, a widget acted as a configurable UI module, and multiple widgets combined to form the entire listing page.
Press enter or click to view image in full size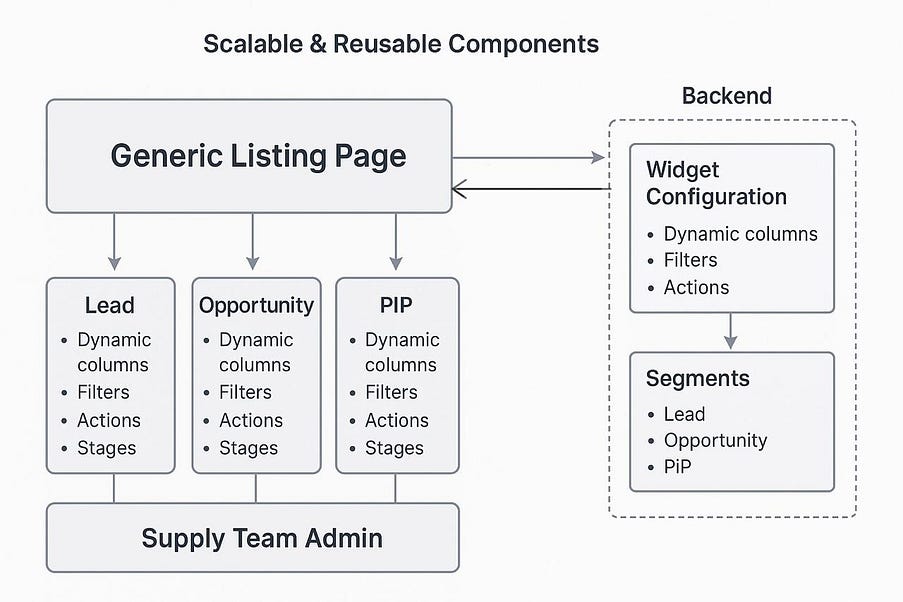
Fig 1.2- High Level Flow
5. 🔄 Redux + Middleware API Flow
All interactions with the backend followed a centralized Redux–middleware flow, ensuring predictability and consistency across the application.
5.1 🚀 Flow:
- Redux Action Dispatched — When the user does something (like changing a filter, clicking pagination, opening a modal, or using a header button), a Redux action is fired.
- Middleware Intercepts — The custom middleware catches this action and makes the right API call.
- Backend Response — The Spring Boot backend sends back data (via GET or POST).
- State Update — Middleware sends the data to the Redux store, which updates the table, filters, modals, or headers automatically.
5.2 Use Cases Where This Flow Shined:
- 🔍 Filtering — Applying and resetting filters on table data.
- 🕹️ Pagination & Lazy Loading — Fetching additional rows smoothly
- 📦 Header & Modal Actions — Consistent, maintainable flows
5.3 ⚡ Lazy loading and Pagination Flow
A unified Redux–middleware flow kept the architecture clean and predictable.
- 🖱️ Clicking “Load More” dispatched a Redux async action
- 🔄 Middleware triggered an API call to fetch the next rows by page/offset
- The response was dispatched back to the store, appending data to the table
- With chunked data fetching and FlatList virtualization, only visible rows were rendered, keeping performance smooth even with thousands of entries.🚀
Press enter or click to view image in full size
🌟 My Takeaways (Frontend Golden Rules)
6.1.🧩 Generic Components
- When building frontend components, always aim to make them generic and reusable. Avoid writing tightly coupled logic that only works in one place.
- Instead, design components to accept props that control their behavior.
This GenericDropdown component is a reusable dropdown built with React Native that supports optional search functionality. When the isSearchable flag is true, it displays a search bar where users can type to filter options. The filtered results are shown in a FlatList, and when an option is selected, the onSelect callback is triggered. A cleanup step ensures that the debounced function is properly canceled when the component unmounts, preventing memory leaks.
import React, { useState, useMemo, useCallback, useEffect } from 'react';
import { View, TextInput, FlatList, Text, TouchableOpacity } from 'react-native';
import PropTypes from 'prop-types';
import debounce from 'lodash/debounce';

const GenericDropdown = ({ options, isSearchable, placeholder, onSelect }) => {
  const [searchTerm, setSearchTerm] = useState('');
  const [visibleOptions, setVisibleOptions] = useState(options);

  // filtering logic
  const filterOptions = (text) => {
    const filtered = options.filter(opt =>
      opt.toLowerCase().includes(text.toLowerCase())
    );
    setVisibleOptions(filtered);
  };

  // memoized debounced filter
  const debouncedFilterOptions = useMemo(
    () => debounce(filterOptions, 300),
    [options]
  );

  // handle search term change
  const onSearchChange = useCallback(
    (text) => {
      setSearchTerm(text);
      debouncedFilterOptions(text);
    },
    [debouncedFilterOptions]
  );

  // cleanup debounce on unmount
  useEffect(() => {
    return () => {
      debouncedFilterOptions.cancel();
    };
  }, [debouncedFilterOptions]);

  return (
    <View style={{ margin: 10 }}>
      {isSearchable && (
        <TextInput
          placeholder={placeholder}
          value={searchTerm}
          onChangeText={onSearchChange}
          style={{ borderWidth: 1, padding: 5, marginBottom: 5 }}
        />
      )}
      <FlatList
        data={visibleOptions}
        keyExtractor={(item, index) => index.toString()}
        renderItem={({ item }) => (
          <TouchableOpacity onPress={() => onSelect(item)}>
            <Text style={{ padding: 10 }}>{item}</Text>
          </TouchableOpacity>
        )}
      />
    </View>
  );
};

GenericDropdown.propTypes = {
  options: PropTypes.arrayOf(PropTypes.string).isRequired,
  isSearchable: PropTypes.bool,
  placeholder: PropTypes.string,
  onSelect: PropTypes.func.isRequired,
};

export default GenericDropdown;
6.2.🧩 Never Hardcode data
Never hardcode static data inside components rather maintain such values in constants or config files so they can be updated easily.
// ⚠️ Problem: If multiple lists use different limits, you'll end up duplicating.

// LeadList.js

const PAGE_LIMIT = 20;  // hardcoded in component
fetch(`/api/leads?page=1&limit=${PAGE_LIMIT}`);
✅ Good Practice: Centralized Config

// constants/config.js

export const CONFIG = {
  PAGE_LIMIT: 20,
};

// LeadList.js

fetch(`/api/leads?page=1&limit=${CONFIG.PAGE_LIMIT}`);
6.3.🔄 State Management
State management is about balance. Keep UI state local (search, modals, toggles), push only shared/business-critical data into Redux or Context, and always normalize your store to avoid deeply nested objects. This makes your app easier to debug, faster, and scalable.
❌ Bad (Nested, Hard to Manage):
state = {
  user: [
    {
      id: 1,
      name: "Izzy",
      details: { email: "[email protected]", phone: "123" }
    },
    {
      id: 2,
      name: "Ray",
      details: { email: "[email protected]", phone: "789" }
    }
  ]
};
✅ Good (Normalized, Scalable):
state = {
  user: {
    byId: {
      1: { id: 1, name: "Izzy", email: "[email protected]", phone: "123" },
      2: { id: 2, name: "Ray", email: "[email protected]", phone: "789" }
    },
    allIds: [1,2]
  }
};
👉 Now updates like state.leads.byId[1].name = "Shreya" are simpler and efficient.
=> Normalize data to avoid deeply nested objects and keep state as close to where it is used as possible, which simplifies debugging and reduces complexity.
6.4.📂 Always explore the existing component library
Many companies provide pre-built components for forms, tables, buttons, dropdowns, modals, etc. You can tweak these components to fit your use case instead of building from scratch.
a) Follow the company’s theme & color palette
Use pre-defined colors, fonts, and spacing from the library or design system.
b) Understand Generic API Systems
Many companies use an intermediate API layer between backend and frontend. Instead of hardcoded responses, APIs often return key-value pairs or widgets, allowing the frontend to dynamically map values to components.
⚡ Tip: Explore and experiment with the company’s component library before building UIs. This saves time, avoids duplication, and ensures your feature follows established standards.
6.5. Responsive & User-Friendly UI 🎨
- Use Flexbox and relative sizes
- Always think like a user — make the interface interactive and intuitive.
a) Show loaders on buttons while data is processing.
b) Use skeleton loaders when lists are loading.
c) Display no-data or error cards when there’s nothing to show.
import React, { useState } from 'react';
import { View, Text, TouchableOpacity, ActivityIndicator, StyleSheet } from 'react-native';
import styles from './styles'; // Assuming you have a separate styles.js file

const LoadingButtonExample = () => {
  // State to track if button is loading
  const [loading, setLoading] = useState(false);

  // Function to handle button press
  const handlePress = () => {
    setLoading(true); // Show loader
    // Simulate an API call or some async action
    setTimeout(() => {
      alert('Action completed!');
      setLoading(false); // Hide loader
    }, 2000);
  };


  return (
    <View style={styles.container}>
      <TouchableOpacity
        style={styles.button}
        onPress={handlePress}
        disabled={loading}
      >
        {loading ? (
          <ActivityIndicator color="#fff" />
        ) : (
          <Text style={styles.buttonText}>Submit</Text>
        )}
      </TouchableOpacity>
    </View>
  );
};

export default LoadingButtonExample;
When the user taps the button, the loading state becomes true, replacing the button text with an ActivityIndicator (spinner) and disabling the button to prevent multiple clicks. After 2 seconds (simulating an API call), it shows an alert and resets the loading state so the button text comes back.
7. Conclusion
“Internships are a crash course in real-world development — make the most of it!”🚀
Use internships as an opportunity to try new things, learn from failures, and grow your skills. I’m happy to connect with anyone interested in technology, software development, or building real-world solutions.


Comments ...
No Comments Yet ...Add One